あるWebアプリ開発においてリンク集の見栄えをよくした件,具体的にどんな作業をしたかをメモしておく.
本稿では,仮のアプリを作って,それを題材に説明する.仮のRailsアプリはrails newで新規のプロジェクトを作成した後にBootstrap4対応の作業を加え,次のコマンドを実行してホーム画面を作った状態とする.ここではその次のステップから説明を始める.
$ bin/rails g controller home index
なお,ルーティング設定は次のとおりconfig/routes.rbにroot to: 'home#index' の一行を追加しておく.http://localhost:3000/にアクセスすると,ホームコントローラのindexメソッドが対応し,app/views/home/index.html.erbが表示されるという設定である.
Rails.application.routes.draw do
root to: 'home#index'
get 'home/index'
# For details on the DSL available within this file, see https://guides.rubyonrails.org/routing.html
end
この状態でhttp://localhost:3000/(ホーム画面)にアクセスすると,次のような画面が表示されるはずだ.
素のリスト
まずは素のリストを作成する.app/views/home/index.html.erbにリンクを列挙したコードを追記する(あと,少し見やすくなるように全体をcontainerで囲んだ).なんだかGoogleのサービスを並べてGoogleの回し者のようになってしまっているが,手頃なところということでこうなった.ご容赦いただきたい.
<div class="container">
<h1>Home#index</h1>
<p>Find me in app/views/home/index.html.erb</p>
<h2>The Link List</h2>
<ul>
<li><%= link_to 'Calendar', 'https://calendar.google.com/' %></li>
<li><%= link_to 'Mail', 'https://mail.google.com/' %></li>
<li><%= link_to 'Map', 'https://maps.google.com/' %></li>
<li><%= link_to 'Scholar', 'https://scholar.google.com/' %></li>
</ul>
</div>
サーバを起動してホーム画面に再びアクセスすると,こんな画面になるはずだ.
それぞれをクリックすると,Googleのカレンダーやらメールやらのサービスに飛ぶはずである.
リストグループ化
ところで,これではいくらなんでも素っ気なさすぎる.なので,まずは,リストグループを使ってボタンの並びにしてみよう.
コードを次のように修正する.ulとliをやめて,list-groupクラス属性を付けたdivタグで囲むようにする.個々のハイパーリンクは,list-group-itemのクラスとする.
<div class="container">
<h1>Home#index</h1>
<p>Find me in app/views/home/index.html.erb</p>
<h2>The Link List</h2>
<div class="list-group">
<%= link_to 'Calendar', 'https://calendar.google.com/',
class: 'list-group-item' %>
<%= link_to 'Mail', 'https://mail.google.com/',
class: 'list-group-item' %>
<%= link_to 'Map', 'https://maps.google.com/',
class: 'list-group-item' %>
<%= link_to 'Scholar', 'https://scholar.google.com/',
class: 'list-group-item' %>
</div>
</div>
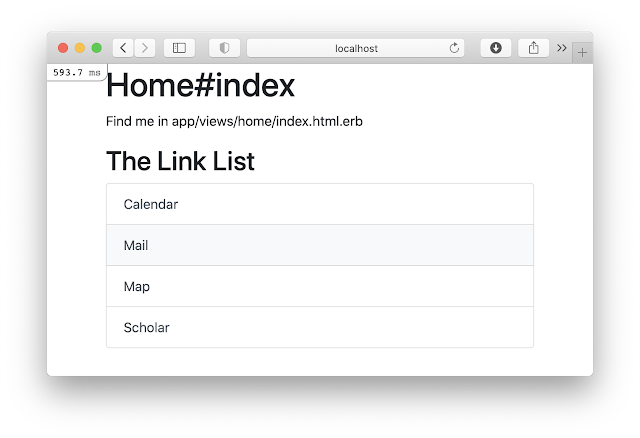
このようにすると,画面は次のようになる.マウスオーバーでハイパーリンク部分の色が少し濃くなり下線が付く.
<div class="container">
<h1>Home#index</h1>
<p>Find me in app/views/home/index.html.erb</p>
<h2>The Link List</h2>
<div class="list-group">
<%= link_to 'Calendar', 'https://calendar.google.com/',
class: 'list-group-item list-group-item-action' %>
<%= link_to 'Mail', 'https://mail.google.com/',
class: 'list-group-item list-group-item-action' %>
<%= link_to 'Map', 'https://maps.google.com/',
class: 'list-group-item list-group-item-action' %>
<%= link_to 'Scholar', 'https://scholar.google.com/',
class: 'list-group-item list-group-item-action' %>
</div>
</div>
こうすると,見た目と動作が少し変化する.ハイパーリンクの青字がなくなってしまったが,ボタン状のセル全体がマウスオーバーでハイライト表示されるようになる.次図は,Mailのところにマウスポインタが当てられている状態である.
アイコンを追加する(準備)
多少,イマ風にはなったものの,まだ,なんとなくそっけない印象である.各項目にアイコンを追加してみよう.アイコンの素材はOcticonsを使う.
嬉しいことに,Railsに対応したgemが用意されている.まずは,Gemfileに次の行を追加しよう.
gem 'octicons_helper'
そして,インストールする.
$ bundle install
...
Using actionview 6.1.3.1
Fetching octicons 12.1.0
Using actionpack 6.1.3.1
...
Using sass-rails 6.0.0
Installing octicons 12.1.0
Fetching octicons_helper 12.1.0
Installing octicons_helper 12.1.0
Bundle complete! 18 Gemfile dependencies, 75 gems now installed.
Bundled gems are installed into `./vendor/bundle`
mac4:menu_example iiojun$
これだけで,octiconというメソッドが使えるようになり,SVGで描画されるアイコンが使い放題になる.SVGなので画像データのような外部リソースが不要というのも嬉しい.座標データのテキスト情報としてHTMLにそのまま埋め込まれるからである.
Railsコンソールでocticonメソッドの動作を確認してみよう.ハートのアイコン「heart」を表示させてみる.引数に与えるアイコン名の指定はシンボルでも文字列でもよい.svgタグで描画するHTML文字列が得られることが分かる.
$ bin/rails c
Running via Spring preloader in process 26925
Loading development environment (Rails 6.1.3.1)
irb(main):001:0> include OcticonsHelper
=> Object
irb(main):002:0> octicon :heart
=> "<svg class=\"octicon octicon-heart\" viewBox=\"0 0 16 16\" version=\"1.1\" width=\"16\" height=\"16\" aria-hidden=\"true\"><path fill-rule=\"evenodd\" d=\"M4.25 2.5c-1.336 0-2.75 1.164-2.75 3 0 2.15 1.58 4.144 3.365 5.682A20.565 20.565 0 008 13.393a20.561 20.561 0 003.135-2.211C12.92 9.644 14.5 7.65 14.5 5.5c0-1.836-1.414-3-2.75-3-1.373 0-2.609.986-3.029 2.456a.75.75 0 01-1.442 0C6.859 3.486 5.623 2.5 4.25 2.5zM8 14.25l-.345.666-.002-.001-.006-.003-.018-.01a7.643 7.643 0 01-.31-.17 22.075 22.075 0 01-3.434-2.414C2.045 10.731 0 8.35 0 5.5 0 2.836 2.086 1 4.25 1 5.797 1 7.153 1.802 8 3.02 8.847 1.802 10.203 1 11.75 1 13.914 1 16 2.836 16 5.5c0 2.85-2.045 5.231-3.885 6.818a22.08 22.08 0 01-3.744 2.584l-.018.01-.006.003h-.002L8 14.25zm0 0l.345.666a.752.752 0 01-.69 0L8 14.25z\"></path></svg>"
irb(main):003:0>
アイコンを追加する(実践……失敗)
octiconメソッドを使うと,SVGのアイコンをコンテンツに埋め込むことができる.Octiconsのページにあるサンプルは次のようなものである(「alert」という名前のアイコンを埋め込んでいる).
<%= octicon "alert", :height => 32,
:class => "right left", :"aria-label" => "hi" %>
それを参考に,アイコンを追加してみよう.link_toで表示するコンテンツの中身なので,少し,工夫が必要である.
<div class="container">
<h1>Home#index</h1>
<p>Find me in app/views/home/index.html.erb</p>
<h2>The Link List</h2>
<div class="list-group">
<%= link_to "#{octicon 'calendar', height: 24,
class: 'right left', 'aria-label': 'calendar'}
Calendar",
'https://calendar.google.com/',
class: 'list-group-item list-group-item-action' %>
<%= link_to "#{octicon 'mail', height: 24,
class: 'right left', 'aria-label': 'mail'}
Mail",
'https://mail.google.com/',
class: 'list-group-item list-group-item-action' %>
<%= link_to "#{octicon 'globe', height: 24,
class: 'right left', 'aria-label': 'globe'}
Map",
'https://maps.google.com/',
class: 'list-group-item list-group-item-action' %>
<%= link_to "#{octicon 'mortar-board', height: 24,
class: 'right left', 'aria-label': 'mortar-board'}
Scholar",
'https://scholar.google.com/',
class: 'list-group-item list-group-item-action' %>
</div>
</div>
さて,表示させてみる.どうなるだろうか?
おやおや?octiconメソッドが生成したSVGのソースコードがそのまま表示されてしまった.これはちょいと都合が悪い.
アイコンを追加する(実践……成功)
ここで,ちょっとした細工をする.
<div class="container">
<h1>Home#index</h1>
<p>Find me in app/views/home/index.html.erb</p>
<h2>The Link List</h2>
<div class="list-group">
<%= link_to "#{octicon 'calendar', height: 24,
class: 'right left', 'aria-label': 'calendar'}
Calendar".html_safe,
'https://calendar.google.com/',
class: 'list-group-item list-group-item-action' %>
<%= link_to "#{octicon 'mail', height: 24,
class: 'right left', 'aria-label': 'mail'}
Mail".html_safe,
'https://mail.google.com/',
class: 'list-group-item list-group-item-action' %>
<%= link_to "#{octicon 'globe', height: 24,
class: 'right left', 'aria-label': 'globe'}
Map".html_safe,
'https://maps.google.com/',
class: 'list-group-item list-group-item-action' %>
<%= link_to "#{octicon 'mortar-board', height: 24,
class: 'right left', 'aria-label': 'mortar-board'}
Scholar".html_safe,
'https://scholar.google.com/',
class: 'list-group-item list-group-item-action' %>
</div>
</div>
何をしたかといえば,表示するコンテンツの文字列部分に,html_safeというメソッド呼び出しを追加しただけである.
通常は,コンテンツに含まれるHTMLのタグなどは全てエスケープ処理が施される.したがって,コンテンツがHTMLのタグ文字列を含んでいたとしても,タグとしての機能は削除されタグ部分も文字列として表示される.そのために,先のようなSVGのソースコードが表示されてしまっていたわけだ.
html_safeメソッドは,「対象とする文字列はHTMLとして安全だから,そのまま表示していいよ」ということを指定するものである.同様の手段として,rawメソッドを使うという方法もある.
さて,再度,挑戦する.どうなるだろうか?
今度はうまくいった.ついでに,アイコンとラベルの間に隙間を空けて,末尾に「»」マークを付けておこう. (non-break space)と»(right angle quote)を使う.Calendar,Mailなどラベル文字列の前後にそれぞれを追記した.ソースコードもいささか複雑になってきた.
<div class="container">
<h1>Home#index</h1>
<p>Find me in app/views/home/index.html.erb</p>
<h2>The Link List</h2>
<div class="list-group">
<%= link_to "#{octicon 'calendar', height: 24,
class: 'right left', 'aria-label': 'calendar'}
Calendar »".html_safe,
'https://calendar.google.com/',
class: 'list-group-item list-group-item-action' %>
<%= link_to "#{octicon 'mail', height: 24,
class: 'right left', 'aria-label': 'mail'}
Mail »".html_safe,
'https://mail.google.com/',
class: 'list-group-item list-group-item-action' %>
<%= link_to "#{octicon 'globe', height: 24,
class: 'right left', 'aria-label': 'globe'}
Map »".html_safe,
'https://maps.google.com/',
class: 'list-group-item list-group-item-action' %>
<%= link_to "#{octicon 'mortar-board', height: 24,
class: 'right left', 'aria-label': 'mortar-board'}
Scholar »".html_safe,
'https://scholar.google.com/',
class: 'list-group-item list-group-item-action' %>
</div>
</div>
表示はこんな感じになる.だいぶいい感じになった.
仕上げ
かなりいい感じになったが,「ハイパーリンクですよ」ということを表すために,ラベル部分は青色にしておいたほうがよさそうだ.Bootstrap4のtext-primaryを使えばよい.
文章中の一部分だけ,部分的に見た目を変えるには,spanタグでその部分を囲んであげればOKである.具体的には,<span class="text-primary">Calendar</span>というように,text-primaryのクラス属性を持つspanタグで囲む.それにはcontent_tagメソッドが利用できる.それぞれのラベル部分を,content_tagメソッドの処理結果を差し込むように修正した.
……というわけで最終的なコードはこうなった.だいぶ長くなったが,順を追って育ててきたので,読み解くのはそれほど難しくないだろう.
<div class="container">
<h1>Home#index</h1>
<p>Find me in app/views/home/index.html.erb</p>
<h2>The Link List</h2>
<div class="list-group">
<%= link_to "#{octicon 'calendar', height: 24,
class: 'right left', 'aria-label': 'calendar'}
#{content_tag :span, 'Calendar',
class: 'text-primary'}
»".html_safe,
'https://calendar.google.com/',
class: 'list-group-item list-group-item-action' %>
<%= link_to "#{octicon 'mail', height: 24,
class: 'right left', 'aria-label': 'mail'}
#{content_tag :span, 'Mail', class: 'text-primary'}
»".html_safe,
'https://mail.google.com/',
class: 'list-group-item list-group-item-action' %>
<%= link_to "#{octicon 'globe', height: 24,
class: 'right left', 'aria-label': 'globe'}
#{content_tag :span, 'Map', class: 'text-primary'}
»".html_safe,
'https://maps.google.com/',
class: 'list-group-item list-group-item-action' %>
<%= link_to "#{octicon 'mortar-board', height: 24,
class: 'right left', 'aria-label': 'mortar-board'}
#{content_tag :span, 'Scholar', class: 'text-primary'}
»".html_safe,
'https://scholar.google.com/',
class: 'list-group-item list-group-item-action' %>
</div>
</div>
表示結果はこのようになる.出発点と比べると,だいぶ洗練されたデザインになったのではなかろうか.


0 件のコメント:
コメントを投稿